Building your own container image
It is possible to define and build your own container images with Singularity. Lets try creating a Singularity container image with Python and pip installed.
Another way to build containers using Cotainr
You also have the option to use a software called cotainr to build containers. We have a guide on how to install a Conda environment with Cotainr here.
First we need to create a Singularity definition file (.def). This definition file is a blueprint for how Singularity should build the container image. It includes information about the base OS to build, which software to install and several other options.
Lets create an empty text file by using the nano command:
nano
Now we can enter the blueprint needed to install our application:
Bootstrap: docker
From: ubuntu:20.04

%post
    # This section is where you install additional packages or software
    # Update package list and install the latest Python and pip version
    apt-get update
    apt-get install -y python3 python3-pip
    pip install numpy pandas scikit-learn matplotlib

%test
    # Define tests to run after the container is built
    python3 --version
In this example we will use docker to pull ubuntu:20.04 as the base OS of our container image.
In the next section,%post, we can define commands that will be executed after the base OS has been installed. In this example, we will update the container and install python3 and pip along with numpy pandas scikit-learn matplotlib packages.
After that we can define commands to run after the container is built in the %test section. Lets try with python3 --version.
You can find more options to use in definition file in the Singularity definition file documentation.
To save the file press CTRL + O and enter a filename ending with .def and hit ENTER. In this example, lets call it python3.def.
Get access token from Sylabs
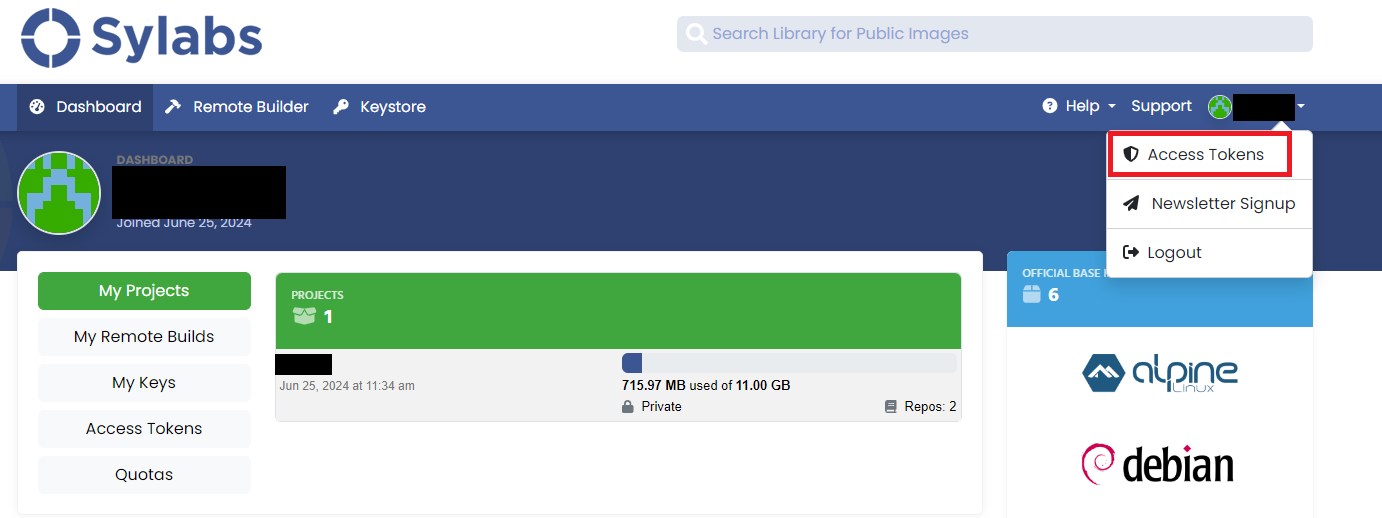
Before you can build the container, you need to get an access token from Sylabs in order to authenticate the build of the container. Head over to https://cloud.sylabs.io/ and Sign up for a new account (its free). Once you are logged it, then hover over your username in the top, and choose Access Tokens

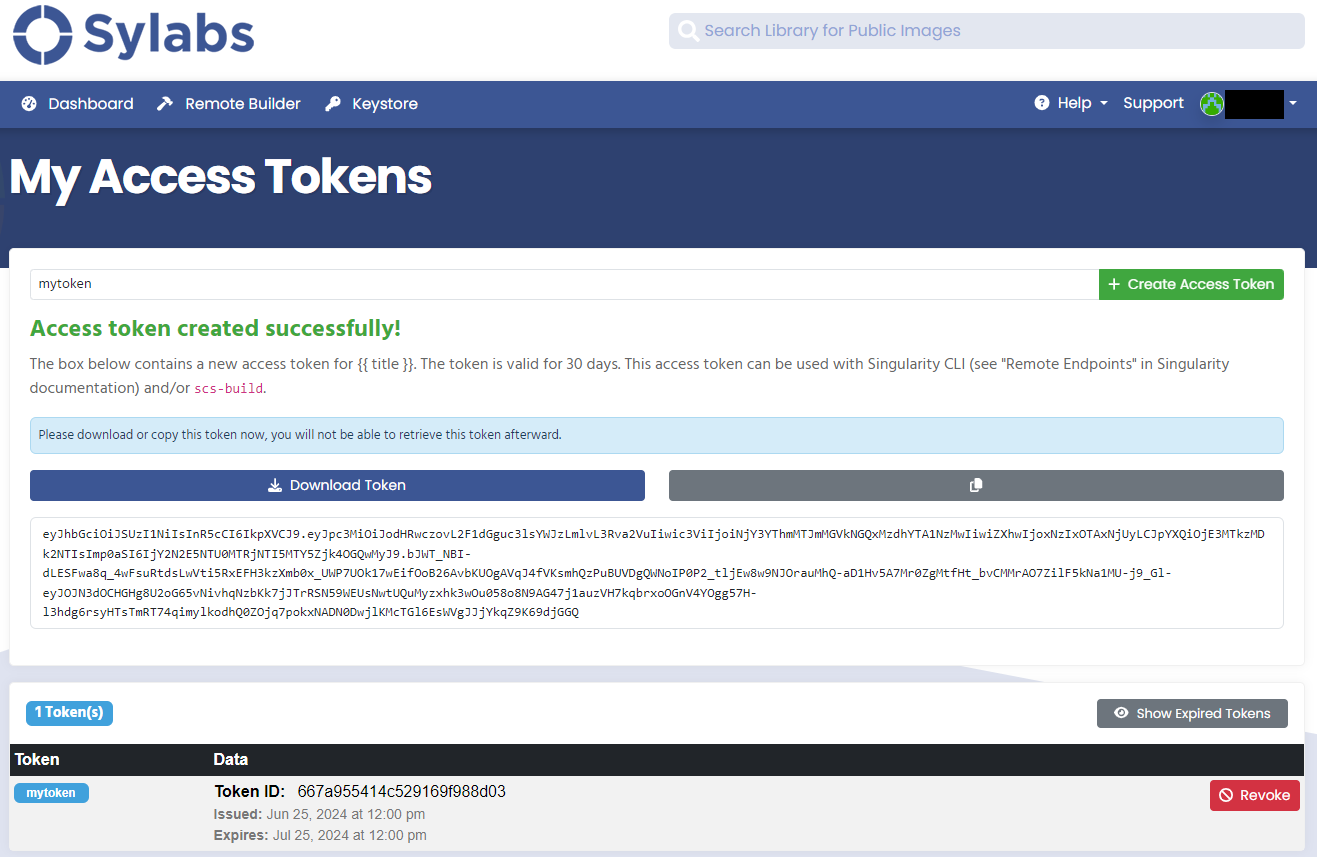
Now, enter a name, in this case "mytoken" and press "Create Access Token". An access token is created, that you can use for 1 month before it expires.

Now go back to the terminal and enter the following command to verify your access token:
srun singularity remote login
When prompted, paste the token you just copied.
Generate an access token at https://cloud.sylabs.io/auth/tokens, and paste it here.
Token entered will be hidden for security.
eyJhbGciOiJSUzI1NiIsInR5cCI6IkpXVCJ9.eyJpc3MiOiJodHRwczovL2F1dGguc3lsYWJzLmlvL3Rva2VuIiwic3ViIjoiNjY3YThmMTJmMGVkNGQxMzdhYTA1NzMwIiwiZXhwIjoxNzIxOTA0MzE4LCJpYXQiOjE3MTkzMTIzMTgsImp0aSI6IjY2N2E5ZmJlMTRjNTI5MTY5Zjk4OGQwYyJ9.DseTflfB6_mT_9HQpX6tUetfdOR7-_QzVdJOu-reO6OY6rFYJ1ZU2acbkPJ2sLqUSGYfTp8bAOrvawZKJQ1hIGkFx3qGjK1s_sFx18dboN0zjFZPbsk41m6Vmu3u5d1tWzfCDn2GgGBgdeJ411M6ECvfAFCV5In3G5abZ44KyY_N1_ziPOYTmLCbtGEbagxBFIBIyGVhMtyFNdaPfVANko8BtsCAhi3_dW0jsT4EzMBpf3afEhdbjIPP5T_gWuTzxqY-VEQQZVYKr-TA9rfv-CPS_kzBK8AQ3kZThryUTi818Xxolr2UGjjph-m4aVN9sLNfSqJu3PQx1UdxBsyoPA
Access Token:
INFO:    Access Token Verified!
...
This You can now build container images from definition files using --remote. Lets build a container image from python3.def file:
srun singularity build --remote python3.sif python3.def
After some time you should see the Python X.X.X version be printed in the terminal, and you should now have a python3.sif container image ready to run.
Lets for example print the matplotlib version:
srun singularity exec python3.sif python3 -c "import matplotlib; print('Matplotlib version:', matplotlib.__version__)"
You can find more information about building containers from Singularity definition files here.